Software startup
This section describes how to start up HiPERCAM’s instrument control software in preparation for observing. It assumes that the hardware has all been powered up and the CCDs have been pumped and cooled.
It is recommended that you open all of the windows described below in the upper-left virtual desktop of the DRPC.
HiPERCAM can be controlled from any unix system connected to its internal network via the switches in the control room or electronics cabinet, although it is usual to use the HiPERCAM data reduction PC (known as the DRPC; IP address 192.168.1.1) in the control room.
At the login screen on the DRPC, enter the username
observerand then the password - if you don’t know the password, please contact one of the HiPERCAM team members.Open an xterm on the instrument control PC (known as the rack PC; IP address 192.168.1.2), which is mounted in the electronics cabinet on the telescope. You can do this in a number of ways:
By double-clicking on the desktop icon labelled rack.
By typing
rack, orssh 192.168.1.2, in an xterm opened on the DRPC.
The username on the rack PC is
insuser. If you need to know the password, please contact one of the HiPERCAM team members. However, you shouldn’t need to enter either the username or password when using the above commands.Type
start_hicamin the xterm on the rack PC. The following windows should then appear:hdriveris the python GUI used to control HiPERCAM. The user will first be prompted to enter the name of thehdriverlog file: enter the date of the start of the night. If the file already exists, it will be appended to (ignore the comment about overwriting). If any of the CCD temperatures, pressures or flow rates are in error, theCCD Head Statuswindow of the GUI will also appear.HServeris the “thin client” which translates the user’s commands entered in the GUI into NGC commands.FileServerallows the HiPERCAM pipeline running on the DRPC to access the data on the rack PC over the internal network.GTCServershows the telescope offsets applied when automatically dithering on the GTC. Note that the values listed in this window are relative values, in arcseconds, whereas those entered in the file of offsets or json file loaded by the user inhdriverare absolute values in arcseconds.HWServeris the hardware server, which is used for communication with the HiPERCAM hardware, such as the NGC CCD controller, vacuum gauges, Meerstetter peltier controllers, focal-plane slide, COMPO and its autoguider. All messages are routed through a WAMP (Web Application Messaging Protocal) server, implemented using Crossbar. So, for example, if a user issues a command to move the slide from thehdriverGUI, the command would be routed as follows: GUI -> Crossbar -> HWServer -> slide. Note that theHWServermay already be running, which is not a problem - it is usually started as part of the pumping and cooling procedure. It is very important to leaveHWServerrunning at all times, otherwise the Grafana server http://pulsar.shef.ac.uk:3000 showing the CCD pressures, temperatures and flow rates will not receive any data.NGC Control Panelis the ESO engineering GUI that provides low-level information and control of the CCD controller. This GUI is only opened if thestart_hicamcommand is entered with the-goption, which is not recommended for most users.
If the GTC telescope server is not running you will get a lot of error messages mentioning CORBA or TCS. Do not worry about these if you get them in the afternoon. If you get them at night, ask the TO to make sure that the GTC telescope server is running.
Power on the HiPERCAM CCDs by clicking the Power on button in the Setup page of
hdriver. If an error is reported in the Command log box ofhdriverand on the ESO GUI (if it has been started), try clicking it again - you should get a response of OK. Unlike with ULTRACAM and ULTRASPEC, no run file is created when the HiPERCAM CCDs are powered on.Open an xterm on the rack PC to use for copying the Observing Blocks (OBs) from the GTC phase 2 web server -
http://gtc-phase2.gtc.iac.es/science/Parser/sequences/- to where the json files are stored for use byhdriveron the rack PC -/home/insuser/.hdriver/apps/. The OBs can be copied using the scriptget_gtc_jsonrun in this xterm, e.g. typingget_gtc_json 01 18AGHIP 5copies over theGTC01-18AGHIP_0005.jsonfile.Open an xterm on the rack PC and type
gtc_tweak_pointing. This allows you to step the telescope to acquire targets, e.g. if you want to move the stars in the HiPERCAM CCD images by 50 pixels in x and -100 pixels in y, type:> Enter desired x and y offset: 50,-100. Note that the comma between the two values is essential - do not use a space.Open an xterm on the rack PC and type
gtc_tweak_focus. This tells you the current position of the telescope focus and allows you to alter it by adding an offset in mm, e.g. if the current telescope position is -2.20mm and you want to alter it to -2.25mm, enter-0.05at the prompt.Finally, open an xterm on the DRPC and type
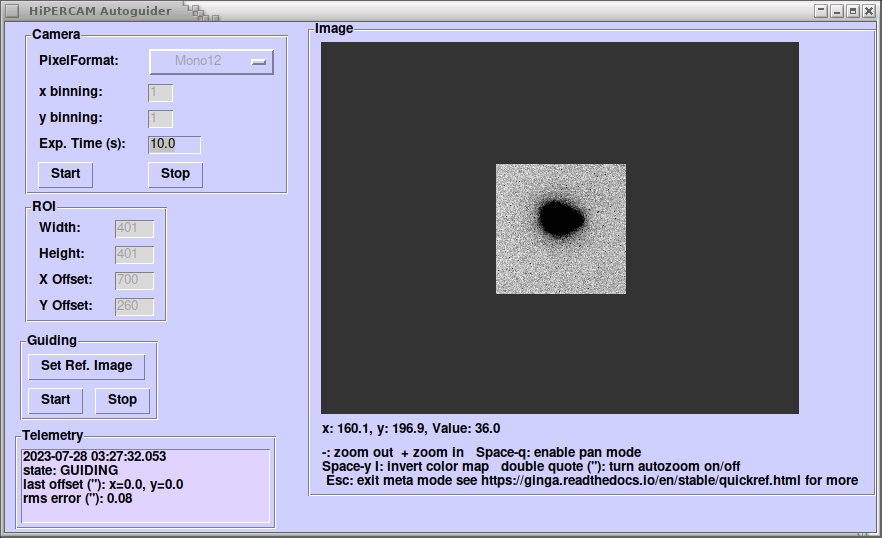
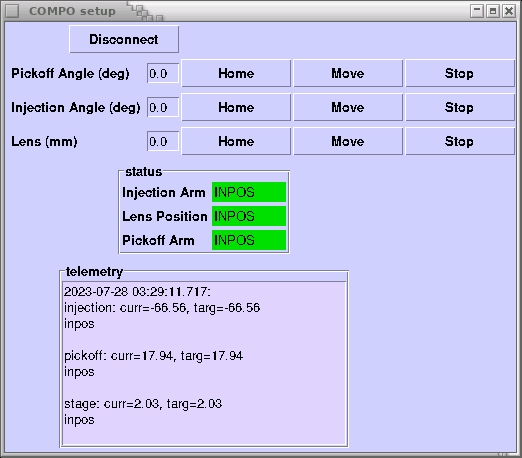
python3
~/scripts/autoguide.py
. This script is used to provide autoguiding from the x,y positions of the stars given in thereducelog files. When prompted for the logfile, remember to give the full path to the file, e.g./home/observer/reduce/2019_06_03/run0012.log. Alternatively, you can use the COMPO autoguider, which you can start by typingautoguiderin an xterm on the DRPC. COMPO itself can be controlled by the COMPO GUI, which opens as part ofhdriver.
You are now ready to observe. The DRPC desktop should look something like the screenshot below, assuming you have also started the ESO GUI.
