Taking data
hdriver is the python GUI used to control HiPERCAM. This should have been started
in the afternoon (see Software startup). The main GUI window is shown
below:
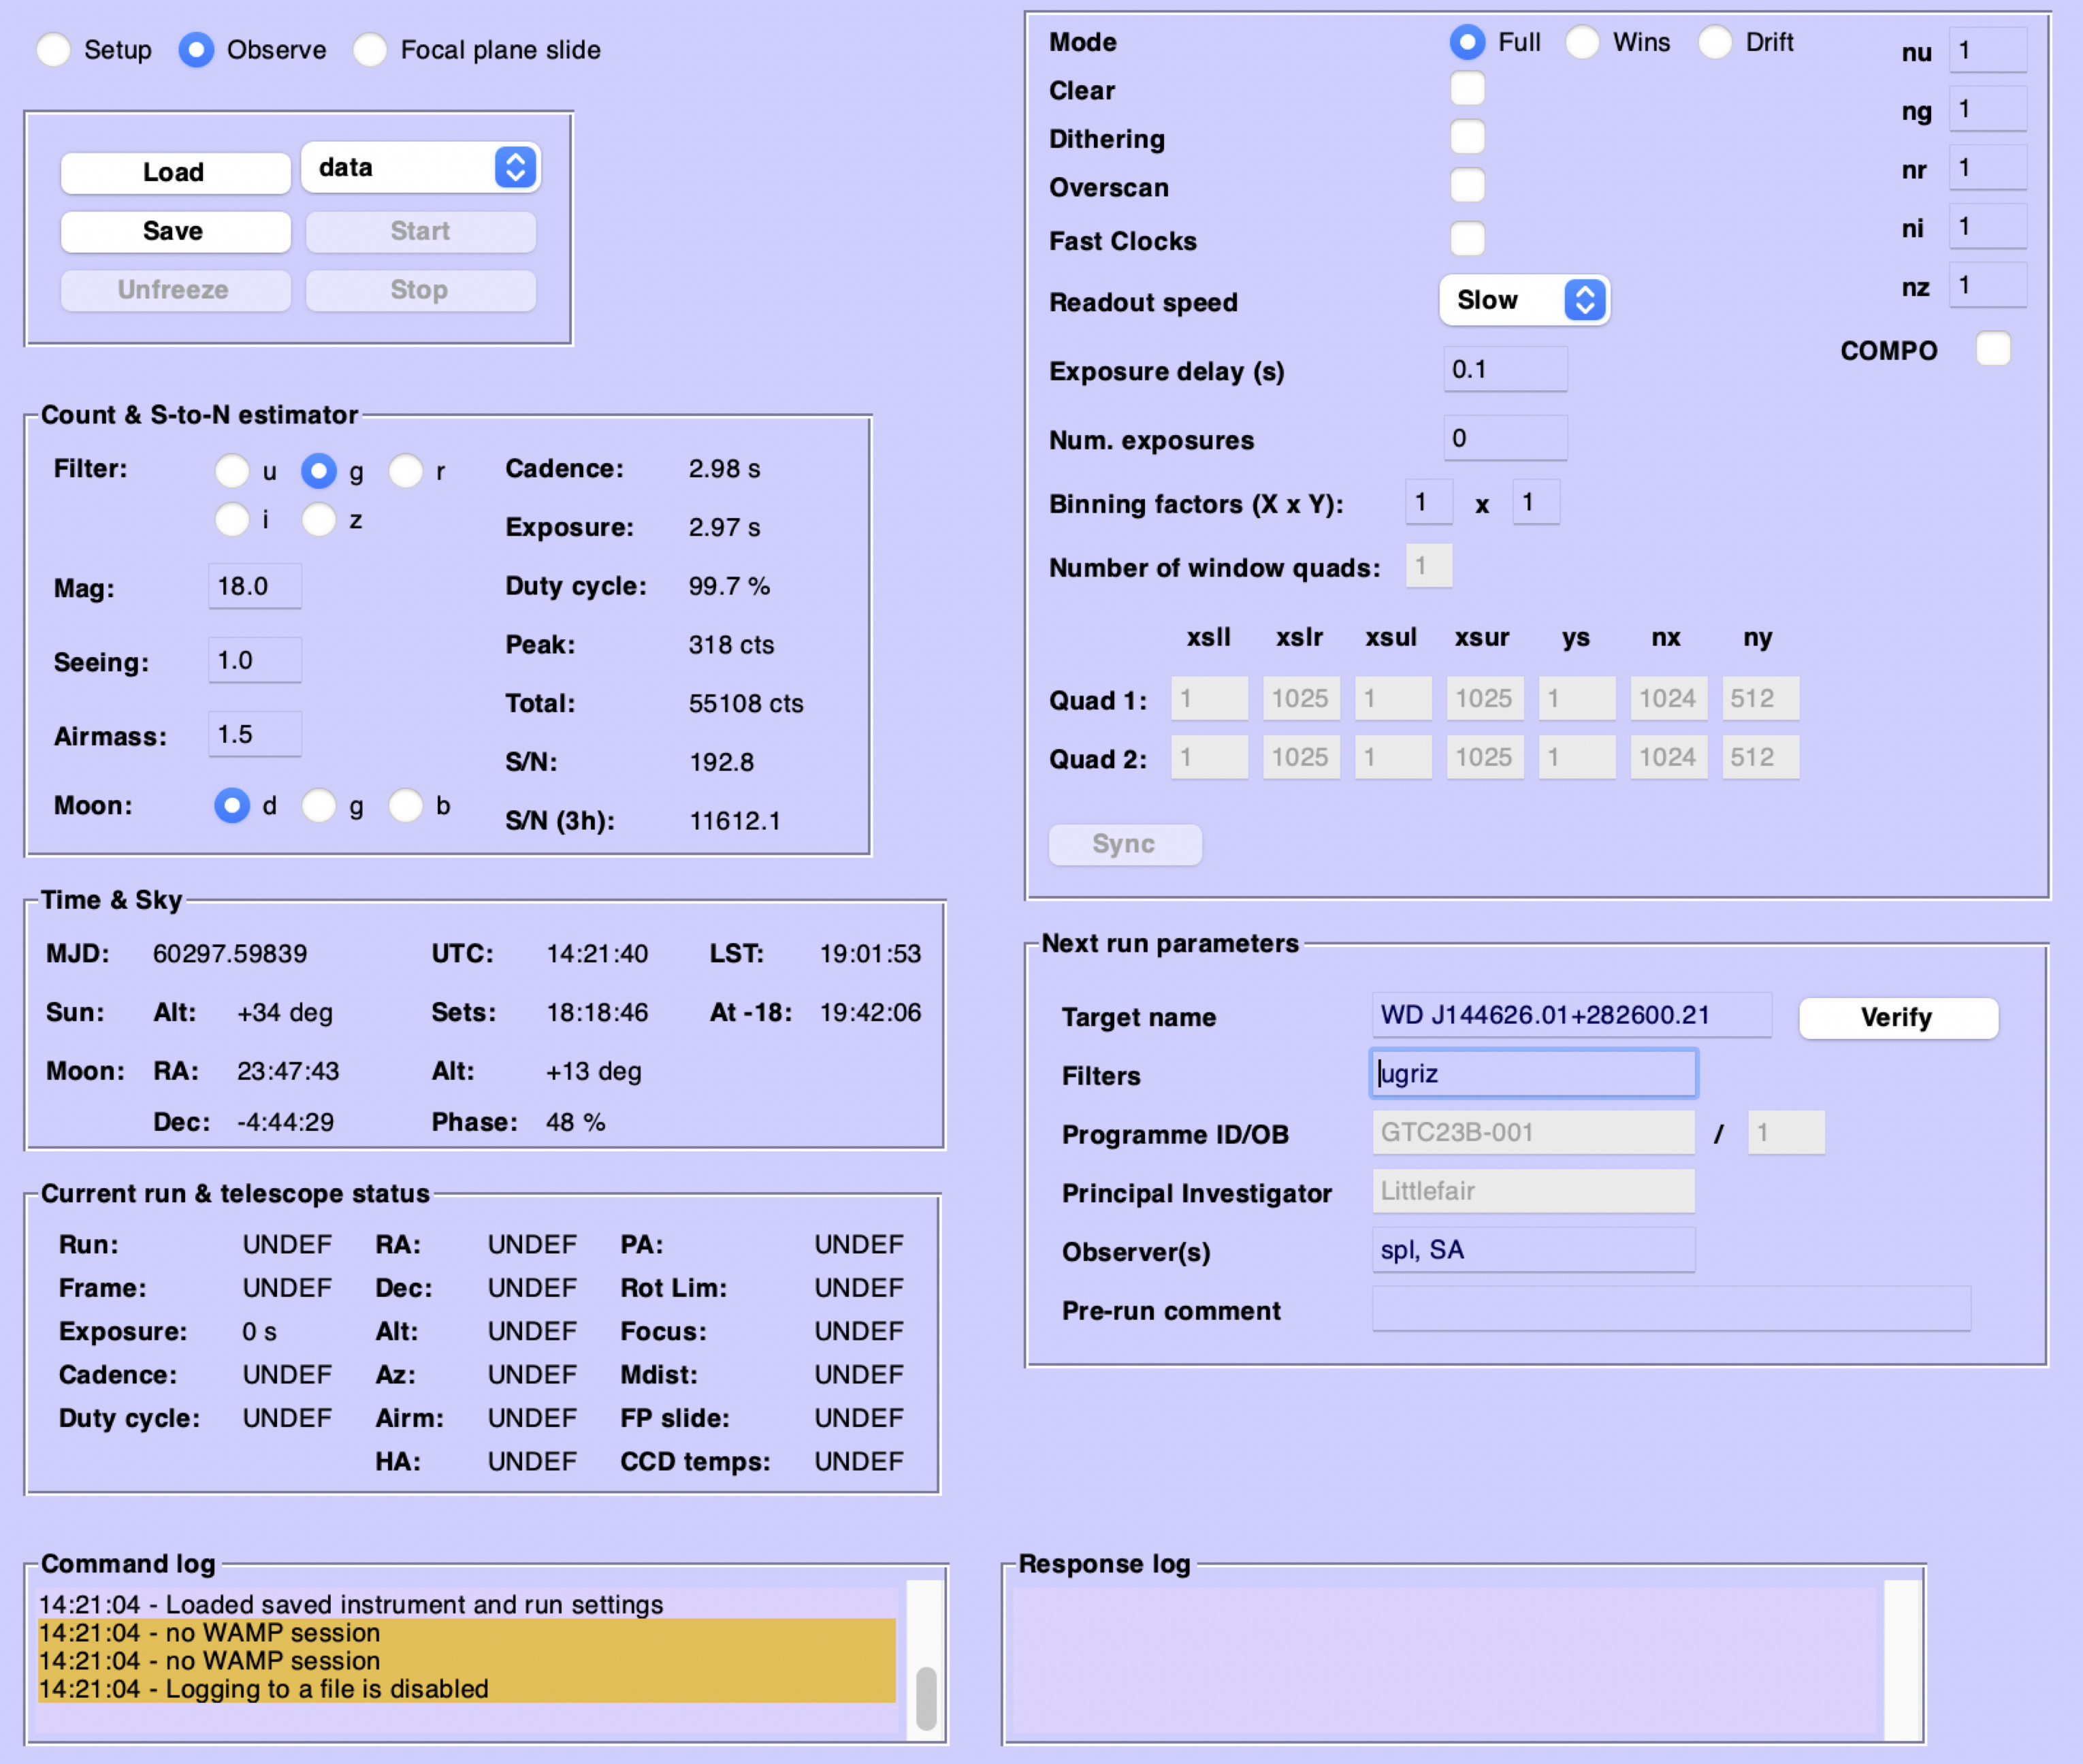
The GUI is split into four main sections:
The top-left section is for sending commands.
The rest of the left hand panel provides a signal-to-noise calculator and a display of current information about the instrument and ephemerides.
The right hand panel provides a section for setting the CCD parameters for the next run to be started, and a panel for metadata about the run (e.g target name, observers etc.).
The bottom section of the GUI provides a log of commands sent and responses received. Error messages will be displayed here.
The command panel
In the command panel there are three radio buttons which control the kind of actions that can be run. In the ``setup``mode you will find the following buttons:
Power On – power on the CCD controller. This will be disabled if is is already powered on.
Power Off – power off the CCD controller. This will be disabled if is is already powered off.
In the observe mode you will find the following buttons:
Load – loads a JSON file containing the CCD setup.
Save – saves the current CCD setup to a JSON file.
Unfreeze – by default, certain buttons will be disabled until the current CCD setup is saved. This button overrides that behaviour, enabling the disabled buttons.
Start – starts a series of exposures, known as a run. This will be disabled if an exposure is underway, or the run type has not been chosen from the drop-down box above.
Stop – stops the current run. This will be disabled if a run is not underway.
Finally in the Focal plane slide mode you will find buttons for controlling the focal plane
slide. The buttons you will typically use are:
block – moves the slide so it covers the whole CCD (useful for bias frames).
unblock – moves the slide outwards so it blocks no light from the CCD.
goto – moves the slide to a specified pixel value in y. The pixel value required is entered in the box to the right.
Starting a run
The usual way in which CCD parameters for the upcoming run are taken is to load a JSON file. The relevant sequence of operations is:
Run the P2 parser for the OB
Download the JSON file created by the P2 parser to the rack PC by typing
get_gtc_jsonfrom a terminal on the rack PC. This command requires the following parametersget_gtc_json proposal_id semester obid, so for the proposal GTC126-23B, we might load OB 1 by typingget_gtc_json 126 23B 1.Some proposals may have unusual semesters, for example we can load OB 3 from proposal GTC01-23BDDT by typing
get_gtc_json 01 23BDDT 3.Load the JSON file into the GUI by clicking the
Loadbutton in the command panel. Select the JSON file you have just downloaded. By default the file chooser should open in the correct directory. If it does not, the JSON files are downloaded to/home/insuser/.hdriver/apps.Check the CCD parameters are correct. If they are not, you can edit them in the GUI (see below). In particular, sometimes you will want to change the exposure time for acquisition runs, as shorter exposures are typically required to check the pointing and focus of the telescope.
Check the run metadata has correctly loaded from the JSON file. If it has not, you can manually edit the target name, filters and observers, but the programme ID and PI boxes should be greyed out.
Select the run type from the drop down box and start the run. The
Startbutton will be disabled until you have selected a run type. The run will continue until you click theStopbutton.
Manually setting the CCD parameters
Every CCD setting can be controlled using the top-right panel of the GUI. Typically this is only required when taking bias frames or during acquisition.
Readout Modes
HiPERCAM has four separate outputs, or channels, per CCD. Full mode reads out all the pixels from all four channels. Drift mode is used for the very highest frame-rates. This complex mode is described in Drift mode.
To enable higher frame rates than available in full-frame mode without the complications of drift mode, HiPERCAM can use one or two windows per CCD output by selecting Wins mode. Since there are four outputs, we refer to window quads to define window settings.
A window quad is defined by the x-start positions of the four quadrants, the size of the windows in x and y, and a y-start value. All windows in a quad must be the same shape, and all share the same y-start value. Increasing y-start moves the windows in from the edges of the CCD towards the centre.
If there are two window quads, they cannot overlap in y.
The window quads are defined using the boxes at the bottom of the panel.
Synchronising windows
If on-chip binning is enabled, it is possible to define windows that do not align
with the boundaries of the binned pixels. This means that one cannot crop binned,
full-frame calibrations (such as bias frames) to apply to the windowed data. If
windows are not synchronised in this manner, the Sync button will be enabled.
Clicking this will align the windows with the boundaries of binned pixels.
Warning
Unless you have obtained special calibrations for your data, e.g binned sky flats, you should make sure all setups are synchronised.
Clear mode
Sometimes extremely short exposures are needed, even with full frame data. Bright standard stars would be one example. It is possible to clear the image area of the CCD, just after the storage area is read out. This allows exposure times as short as 10 microseconds. These short exposures come at the expense of efficiency, since the charge accumulated whilst the storage area was reading out is lost.
For example, if the storage area takes 2s to read out, clear mode is enabled and the exposure delay is set to 1s, then an image would be take every 3s with a duty cycle of 30%.
As a result, if the user needs short exposure times to avoid saturation, or if short exposures are needed for science purposes, then it is often preferable to use a faster readout speed, Windowed mode or Drift mode to achieve this without sacrificing observing efficiency.
Clear mode is enabled by selecting the Clear checkbox.
Exposure multipliers
The instrument setup will determine the exposure time and cadence of your data.
It is unlikely that this exposure time will be optimal for the target in all bands.
Many objects will need longer exposures at the blue or red extremes. HiPERCAM supports
exposure multipliers. These allow a CCD to be readout once every N exposures, and
can be changed in the fields labelled nu, ng…
Other settings
Other settings are described below, in the order they appear in the GUI.
DitheringEnable the dithering of the telescope between exposures. If this box is checked you will be prompted for a file containing a list of the absolute offsets in arcseconds.
OverscanEnable reading out of the overscan region of the CCDs. Not normally used.
Fast clocksOptionally, the rate at which charge is clocked in the CCDs can be increased. This will not affect readout noise, but will have an impact on charge transfer efficiency. As of today, this impact has not been well characterised, but we do not think it is serious. Typically used with drift mode for the highest frame rates.
Readout SpeedFast readout speed reduces the minimum exposure time in full-frame readout from 2.9s to 1.2s. This comes at the expense of increased readout noise. The impact of this on the S/N of the target is shown in the signal-to-noise calculator on the left-hand side of the GUI.
Exposure delay (s)For any given setup (binning, window sizes and positions, readout mode), there is an absolute minimum exposure time which is set by the time taken to readout the storage area. One can expose for longer than this minimum by adding an arbitrary “exposure delay”; this is a key parameter of the setup.
So perhaps your setup can be read-out in 3 seconds, but for reasons of signal-to-noise perhaps you add 7 seconds exposure delay. Then your exposure time (and cadence, as dead time is negligible in this case) will be 10 seconds. If you set the exposure delay to 0 however, your exposure will be 3 seconds and you wouldn’t be able to go faster without altering the setup.
Num. exposuresThe number of exposures in the run. If you set this to 0 the run will continue until the
Stopbutton is pressed. Usually this is the best way of operating, so that the camera does not stop taking data without user intervention.Binning factorsAmount of on-chip binning in x and y. Binning reduces the impact of readout noise and is often used with HiPERCAM since the native unbinned pixel scale of HiPERCAM on the GTC is just 0.081 arcseconds per pixel.